If you are trying to update Eclipse Galileo (3.5) and Helios (3.6) behind Proxy, you might run into problems like "Site is not found".
So, obvious course of action would be to check Proxy Configuration. Now, you change the settings and ensure that it has right authorization details.
Even after these steps, eclipse would fail to update and error message remains same.
It sounds baffling and it sure is.
After doing some googling for it, I found that Eclipse 3.5 onwards, FileTransferAPI has been changed. In ECF 3.0/Eclipse 3.5 the primary provider is based upon Apache httpclient 3.1. This was introduced in the ECF 3.0/Eclipse 3.5 cycle because the previous provider that was based upon the JRE URLConnection implementation proved insufficiently reliable (i.e. see bug 166179).
Unfortunately, the Apache httpclient implementation, although more robust than the URLConnection-based provider, does not support NTLMv2 proxies directly (for an explanation of why, see here).
For NTLMv2 Proxies, that require username and password for access the workaround is to
1. Disable the ECF httpclient provider.
2. Provide the NTLMv2 proxy authentication info (proxyhost, domain, username, and password)
In ECF 3.0/Galileo both can be done via system properties provided to Eclipse on startup. Here is an example using 'myproxy', 'mydomain', 'myusername', and 'mypassword':
Following settings can be put in eclipse.ini so that Eclipse does not use HTTPClient
-Dorg.eclipse.ecf.provider.filetransfer.excludeContributors=org.eclipse.ecf.provider.filetransfer.httpclient
-Dhttp.proxyPort=8080
-Dhttp.proxyHost=myproxy
-Dhttp.proxyUser=mydomain\myusername
-Dhttp.proxyPassword=mypassword
-Dhttp.nonProxyHosts=localhost|127.0.0.1
once you do this, you should be able to update Eclipse.
References:
Monday, January 31, 2011
Tuesday, January 25, 2011
Setting up Apache Solr in Eclipse with Tomcat
Prerequisites for this exercise:
• Apache Solr 1.4.1 ( or some other release)
• Eclipse WTP
• Apache Tomcat 6.x
Steps are:
1. Extract Solr-1.4.1 release into C:\ Drive. For my example, directory is C:\apache-solr-1.4.1
2. Launch Eclipse and create a workspace, say solr-workspace
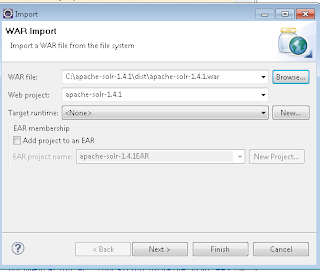
3. Import apache-solr-1.4.1.war file in your workspace by clicking on FIle -> Import,
Select Web --> War as the Import Source.
WAR File: C:\apache-solr-1.4.1\dist\apache-solr-1.4.1.war
Web Project: apache-solr-1.4.1
Click on Finish.

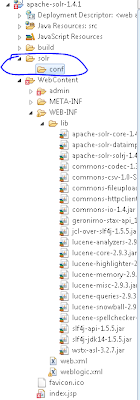
4. Create a folder called solr in the project and create another folder called conf inside solr as shown below:

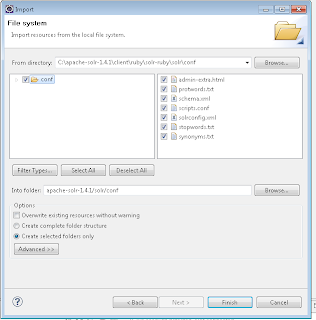
5. Copy files from C:\apache-solr-1.4.1\client\ruby\solr-ruby\solr\conf into /solr/conf folder.
You can define your schema in schema.xml

6. Create a Tomcat Server using server wizard. Defaults would work fine.

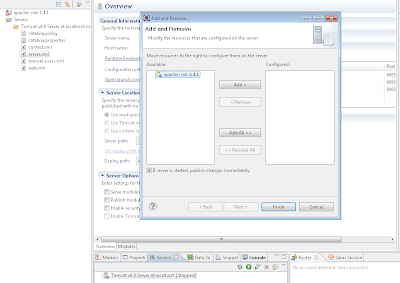
7. Add project apache-solr-1.4.1 to your server as shown below
8. Edit server.xml to let tomcat know where are solr config files are:
<Context docBase="apache-solr-1.4.1" path="/apache-solr-1.4.1"
reloadable="true" source="org.eclipse.jst.j2ee.server:apache-solr-1.4.1">
<Environment name="solr/home" type="java.lang.String"
value="C:\myworkspaces\solr-workspace\apache-solr-1.4.1\solr" override="true"/>
</Context>
9. Start Server and you should see following
INFO: Using JNDI solr.home: C:\myworkspaces\solr-workspace\apache-solr-1.4.1\solr
INFO: Solr home set to 'C:\myworkspaces\solr-workspace\apache-solr-1.4.1\solr\'
Troubleshooting Tips
If your installation is showing errors that solr home is not found then do following
• ensure that server.xml is having right entry
• solr directory exists and has conf as child folder and all the files are there
• clean tomcat-server and clean tomcat work directory
• Apache Solr 1.4.1 ( or some other release)
• Eclipse WTP
• Apache Tomcat 6.x
Steps are:
1. Extract Solr-1.4.1 release into C:\ Drive. For my example, directory is C:\apache-solr-1.4.1
2. Launch Eclipse and create a workspace, say solr-workspace
3. Import apache-solr-1.4.1.war file in your workspace by clicking on FIle -> Import,
Select Web --> War as the Import Source.
WAR File: C:\apache-solr-1.4.1\dist\apache-solr-1.4.1.war
Web Project: apache-solr-1.4.1
Click on Finish.

4. Create a folder called solr in the project and create another folder called conf inside solr as shown below:

5. Copy files from C:\apache-solr-1.4.1\client\ruby\solr-ruby\solr\conf into /solr/conf folder.
You can define your schema in schema.xml

6. Create a Tomcat Server using server wizard. Defaults would work fine.

7. Add project apache-solr-1.4.1 to your server as shown below
8. Edit server.xml to let tomcat know where are solr config files are:
<Context docBase="apache-solr-1.4.1" path="/apache-solr-1.4.1"
reloadable="true" source="org.eclipse.jst.j2ee.server:apache-solr-1.4.1">
<Environment name="solr/home" type="java.lang.String"
value="C:\myworkspaces\solr-workspace\apache-solr-1.4.1\solr" override="true"/>
</Context>
9. Start Server and you should see following
INFO: Using JNDI solr.home: C:\myworkspaces\solr-workspace\apache-solr-1.4.1\solr
INFO: Solr home set to 'C:\myworkspaces\solr-workspace\apache-solr-1.4.1\solr\'
Troubleshooting Tips
If your installation is showing errors that solr home is not found then do following
• ensure that server.xml is having right entry
• solr directory exists and has conf as child folder and all the files are there
• clean tomcat-server and clean tomcat work directory
Friday, January 07, 2011
Computer says no
Good read about how messy the computer systems are, at big banks.
As a result banks tend to operate lots of different databases producing conflicting numbers. “The reality was you could never be certain that anything was correct,” says a former executive at Royal Bank of Scotland. Reported numbers for the bank’s exposure were regularly billions of dollars adrift of reality, he reports; finding the source of the error was hard.
As a result banks tend to operate lots of different databases producing conflicting numbers. “The reality was you could never be certain that anything was correct,” says a former executive at Royal Bank of Scotland. Reported numbers for the bank’s exposure were regularly billions of dollars adrift of reality, he reports; finding the source of the error was hard.
Subscribe to:
Comments (Atom)